Consultation Flow :
I'm Looking for
Get Started Now
Our specialist will get back to you within 1 working day!
LED Strip Light Photo Install Tutorial.
LED Strip Light Photo Install Tutorial
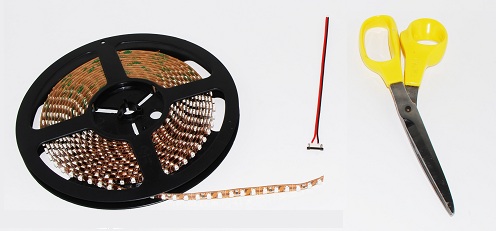
Step one: Materials Needed
Have all your materials ready. You will need scissors, LED flexible strip lights, a solderless connector, ruler (if needed), and a set of hands.
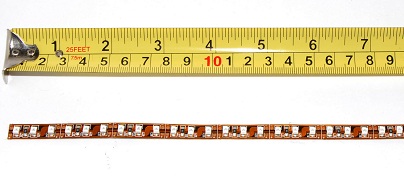
Step Two: Measuring how many feet of LED strip you need
You may have your LED strip light sent to you in a reel (16 feet) or by the foot, depending on the quantity ordered. Decide how much flexible LED strip lighting you will need for your project. Since the LED strip can only be cut every third LED, you may have to go slightly over or under your desired specification.
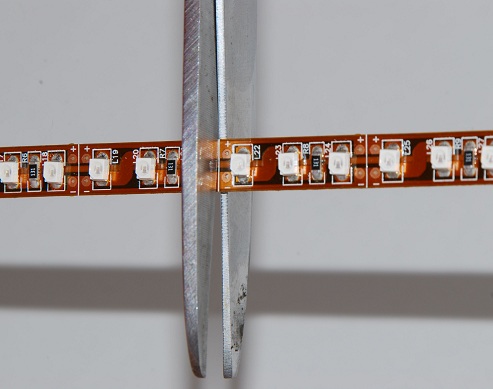
Step Three: How to cut the LED strip
As you can see below, the flexible strip light can only be cut along the designated lines. Take a sharp pair of scissors and cut along the line.
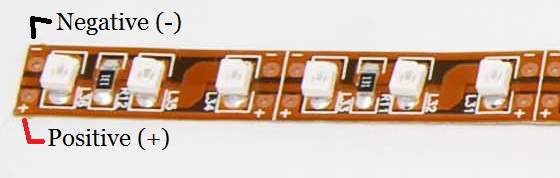
Step Four: Pay attention to positive and negative markings
IMPORTANT: Notice the positive and negative sides of the LED strip light. This is important for the next few steps. Sometimes when you cut the LED strip light , things can get mixed around.
Step Five: Introduction to the solderless connector
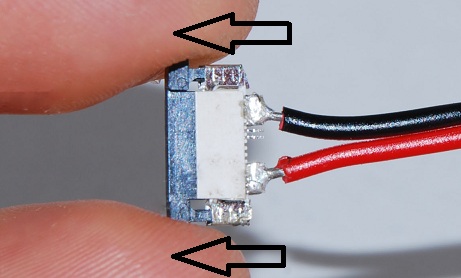
Each Solderless Connector has two sides. To insure you have the correct side up, make sure the wider of the white sides face up. This is the top.
BE GENTLE and pull the locking device out away from the wires. Do not pull on the wires to do so, as the solderless connector is fragile.
Step Six: Attaching the solderless connector to the LED strip
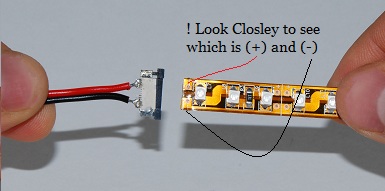
IMPORTANT: Color does not always matter! Make sure you follow the positive side of the flex strip down through the solderless connector wire to the power supply. Red/black can either mean (+) or (-) depending on what side you have hooked the connector to.
Step Seven: Securing the tray to the LED light
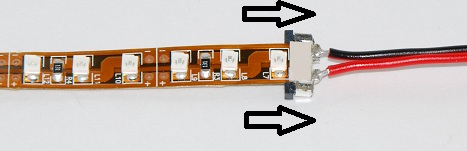
In the example below, if we were to attach the Solderless Connector to the other side of the flexible strip light, the red would be negative and the black positive.
Next, GENTLY secure the locking tray back in place, connecting the terminals of the LED flexible strip light to the connector. Be gentle and make sure the mounting tray is securely closed, or the lights will not work.
Step Eight: Connecting the LED strip to power
You are now ready to plug in your LED Flexible strip light to the LED power supply.
This can be done a few ways.
1. Wire Nuts
2. Butt Splices
3. Terminal blocks
4. DC Coaxial Connectors with or without screw terminals
Match the positive and negative markings with the positive and negative wires from the power supply. Make sure the power is off when you do this.
Step one: Materials Needed
Have all your materials ready. You will need scissors, LED flexible strip lights, a solderless connector, ruler (if needed), and a set of hands.
Step Two: Measuring how many feet of LED strip you need
You may have your LED strip light sent to you in a reel (16 feet) or by the foot, depending on the quantity ordered. Decide how much flexible LED strip lighting you will need for your project. Since the LED strip can only be cut every third LED, you may have to go slightly over or under your desired specification.
Step Three: How to cut the LED strip
As you can see below, the flexible strip light can only be cut along the designated lines. Take a sharp pair of scissors and cut along the line.
Step Four: Pay attention to positive and negative markings
IMPORTANT: Notice the positive and negative sides of the LED strip light. This is important for the next few steps. Sometimes when you cut the LED strip light , things can get mixed around.
Step Five: Introduction to the solderless connector
Each Solderless Connector has two sides. To insure you have the correct side up, make sure the wider of the white sides face up. This is the top.
BE GENTLE and pull the locking device out away from the wires. Do not pull on the wires to do so, as the solderless connector is fragile.
Step Six: Attaching the solderless connector to the LED strip
IMPORTANT: Color does not always matter! Make sure you follow the positive side of the flex strip down through the solderless connector wire to the power supply. Red/black can either mean (+) or (-) depending on what side you have hooked the connector to.
Step Seven: Securing the tray to the LED light
In the example below, if we were to attach the Solderless Connector to the other side of the flexible strip light, the red would be negative and the black positive.
Next, GENTLY secure the locking tray back in place, connecting the terminals of the LED flexible strip light to the connector. Be gentle and make sure the mounting tray is securely closed, or the lights will not work.
Step Eight: Connecting the LED strip to power
You are now ready to plug in your LED Flexible strip light to the LED power supply.
This can be done a few ways.
1. Wire Nuts
2. Butt Splices
3. Terminal blocks
4. DC Coaxial Connectors with or without screw terminals
Match the positive and negative markings with the positive and negative wires from the power supply. Make sure the power is off when you do this.